Article Number: 000022224
CloudIQ: General Procedures to Onboard PowerVault ME Series Arrays to CloudIQ
Summary: CloudIQ is a cloud-based application that provides for simple and proactive monitoring and troubleshooting of your Dell IT infrastructure including integration with VMware. It leverages machine learning to proactively monitor and measure the overall health of servers, storage, and switches through intelligent, comprehensive, and predictive analytics. CloudIQ is available at no additional charge for products with a valid ProSupport (or higher) contract. ...
Article Content
Instructions
- Getting started.
- Enterprise business account registration
- Enable SupportAssist and CloudIQ on the PowerVault ME4 series.
- Enable SupportAssist and CloudIQ on the PowerVault ME5 series.
- Information required to onboard PowerVault ME series in CloudIQ
- Onboarding the PowerVault ME series in CloudIQ
- Additional information
Pre-requisites to use PowerVault ME series arrays with Dell CloudIQ service
-
PowerVault ME4 Series All Flash and Hybrid systems that are installed with minimum firmware version GT280R004-01.
-
All PowerVault ME5 Series are supported.
-
The PowerVault Series CloudIQ solution leverages Dell SupportAssist for data collection. This must be enabled and configured successfully on each individual ME Series array before data is sent to CloudIQ.
-
An active ProSupport or ProSupport Plus agreement and an accepted End User License Agreement (EULA) for the PowerVault ME Series systems are required. You can view which agreement type covers your system by entering the PowerVault service tag to Dell.com/support.
-
Completed customer registration at dell.com/support (for each user) is required. This is required to gain access into the Dell support portal which also includes access to CloudIQ. See Enterprise business account registration section for instructions.
Enterprise business account registration
- If an account is already created, no additional registration is required, you can log in to CloudIQ.dell.com. Go to the Enable SupportAssist and CloudIQ on PowerVault ME4 or Enable SupportAssist and CloudIQ on PowerVault ME5 section and enable both SupportAssist and CloudIQ support on your PowerVault ME array.
- New Dell customers or existing Dell customers must register an enterprise support business account. Follow Dell KB article 000021768, How to register for access to Dell Technologies Online Support or Upgrade an Existing Account.
Select the option "I’m an employee of an organization that has purchased Dell enterprise products" in the Additional Access Rights Required page and click Submit.
NOTE: Registration may take longer to be authorized when the user is the first person registering from a company. In such cases, Dell customer service reconciles the exception by working with this first user. During the time of the exception process, users cannot log in to CloudIQ. If you receive the message "Invalid Account Type" when logging in for the first time. See Dell KB article 000201709: CloudIQ: Invalid Account Type message when logging into CloudIQ for the first time
Obtaining assistance with account enablement, account login or account details updates.
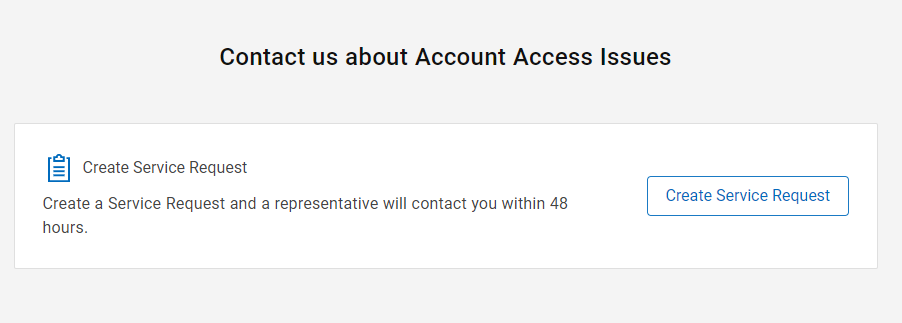
If you encounter issues with your account, either contact Dell Technical Support, or sign in to dell.com. Click this Administrative Support link to directly engage the Dell Customer Services who can validate the account settings and enable the business user access.
- Select Account Access Issues from the drop-down menu. You must be logged in to dell.com to see this option.
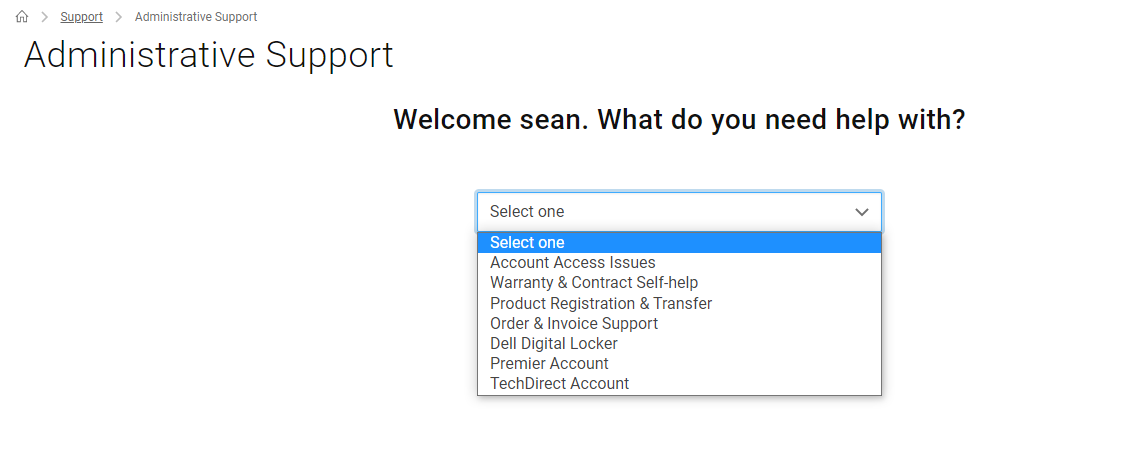
- Click Create Service Request.
- Provide the following information in the Create Service Request dialog that appears.
- Phone number: <your contact number>
- Preferred contact method: Choose email or phone.
- URL you want to reach: https://CloudIQ.dell.com
- Request Summary: <add the following information>
- Purpose: Enable business user access for my account.
- PowerVault Service tag: <device 7 digit alpha-numeric service tag>
- Company Name: <provide your company or organisation name>
- Equipment Site Address: <site address where equipment is installed>
- Submit the request when complete.
- You receive an automated email response from Dell Technologies with the case number and links.

NOTE: Customer service response times can take between 24 to 48 hours over the course of standard business days to complete validation and enable the account. Follow up queries from Dell customer services may occur if additional information is required.
Once the account is enabled, you can log in to https://CloudIQ.dell.com and onboard the PowerVault ME array.
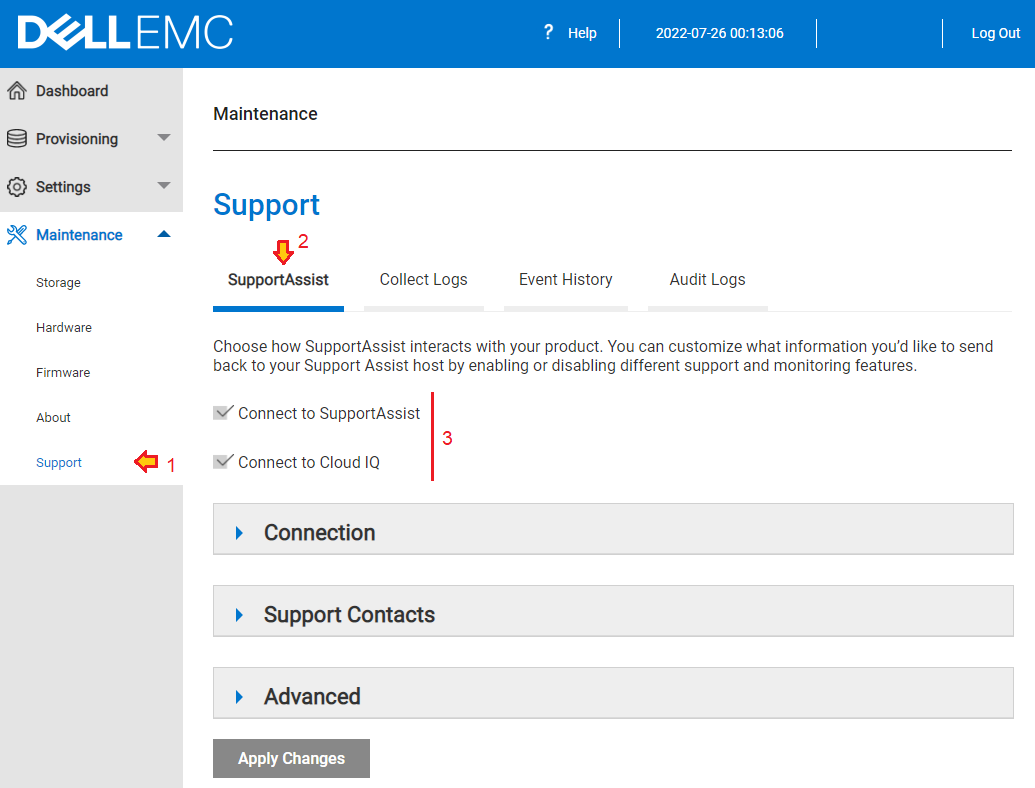
Enable SupportAssist and CloudIQ on PowerVault ME4
- The System Settings panel provides options for you to quickly configure your system. Access the panel by doing one of the following:
- In the Home topic, select Action > System Settings, then click the SupportAssist tab.
- In the System topic, select Action > System Settings, then click the SupportAssist tab.
- Select the SupportAssist checkbox.
The SupportAssist agreement is displayed.
- Read through the agreement, then acknowledge it by clicking Accept.
The system attempts to establish connectivity with the remote support server. Once connectivity is established, the system collects an initial full debug log dump and sends it to the SupportAssist server.
NOTE: If the system cannot contact the remote support server, an error message is displayed that contains details about the connection failure and provides recommended actions.
NOTE: If the system cannot contact the remote support server, an error message is displayed that contains details about the connection failure and provides recommended actions.
- In the Contact Information tab, type the primary contact information and select the preferred contact settings.
- To receive email messages when a storage system issue occurs, select the Yes, I would like to receive email messages from SupportAssist when issues arise, including hardware failure notifications checkbox.
- In the CloudIQ tab, check Enable CloudIQ and click Apply.

More details on configuring and troubleshooting SupportAssist on PowerVault ME4 are found in the following Dell articles:
- KB 54807, ME4: How to enable SupportAssist
- KB 197525, ME4: Last SupportAssist log upload failed, an MC internal error has occurred.
- KB 181685, CloudIQ: ME4 - How to troubleshoot CloudIQ upload failures
- KB 120519, PowerVault: How to Collect support logs for ME4 models
Enable SupportAssist and CloudIQ on PowerVault ME5
- SupportAssist must be enabled and functioning in order to send performance telemetry data to the CloudIQ service.
- The integrated SupportAssist feature on PowerVault ME5 series arrays can be configured to Connect Directly or Connect using Gateway Server to send telemetry data.
- An access key and PIN must be generated as a two factor authentication method to enable key exchange between ME5 SupportAssist and the Dell backend server.
- Ensure Enable CloudIQ and Enable SupportAssist are both checked.
For more SupportAssist configuration and troubleshooting information see the following knowledge base articles:
- ME5: How to generate an Access Key and Pin to enable SupportAssist
- PowerVault ME5: How to configure SupportAssist to Connect using Gateway Server
- ME5: Alert: Lost connectivity to the Dell SupportAssist backend and Event: Scheduler - SupportAssist is not registered with the Dell backend.
- ME5: How to collect PowerVault support logs
Information required to onboard PowerVault ME series in CloudIQ
To onboard the PowerVault ME series array within in CloudIQ, you need the following information when adding your PowerVault ME system.
- Enclosure World Wide Name (WWN)
- PowerVault Service Tag
- Controller module firmware bundle version
The information attributes can be obtained using PowerVault Manager, however, the quickest way to get this information is open an SSH session to a PowerVault ME controller management IP address using a terminal application such as PuTTY .
Type the following commands and copy the output to a text file.
- Record the Encl WWN value from enclosure 0,
show enclosures
# show enclosures
Encl Encl WWN         Name                  Location              Rack Pos  Vendor   Model            Top Level Assembly Part Number   EMP A CH:ID Rev   EMP B CH:ID Rev   Midplane Type  Health
-----------------------------------------------------------------------------------------------------------------------------------------------------------------------------------------------
0    500C0FF0F03123C                                             0    0    DellEMC  Array212SAS      ABCD122                          00:127      52A0  01:127      52A0   2U12-D-12G
-----------------------------------------------------------------------------------------------------------------------------------------------------------------------------------------------
Success: Command completed successfully. (2022-07-25 13:48:42)
- Record the Service Tag value for enclosure 0,
show service-tag-info
# show service-tag-info
Encl Service Tag
-----------------
0    ABCD122
-----------------
Success: Command completed successfully. (2022-07-25 13:52:44)
- Record the Bundle Version value,
show versions
# show versions
                Controller A Versions        Controller B Versions
                ---------------------        ---------------------
Bundle Version: GT280R010-01                 GT280R010-01
Build Date:     Mon Jul  4 04:06:18 MDT 2022 Mon Jul  4 04:06:18 MDT 2022

Success: Command completed successfully. (2022-07-25 13:57:55)
Onboarding the PowerVault ME series in CloudIQ
Note: Each team member that must view PowerVault ME or SC Series arrays must know the attributes to add the array to their view. This behavior is different to other Dell products such as PowerStore or Unity and this may change in future releases.
- Access Dell CloudIQ service at https://cloudiq.dell.com with username (email) and password credentials.
To sign in, you are initially be redirected to the Dell.com account login screen.

- The first time a new CloudIQ user logs in to CloudIQ, a series of introductory welcome screens display.

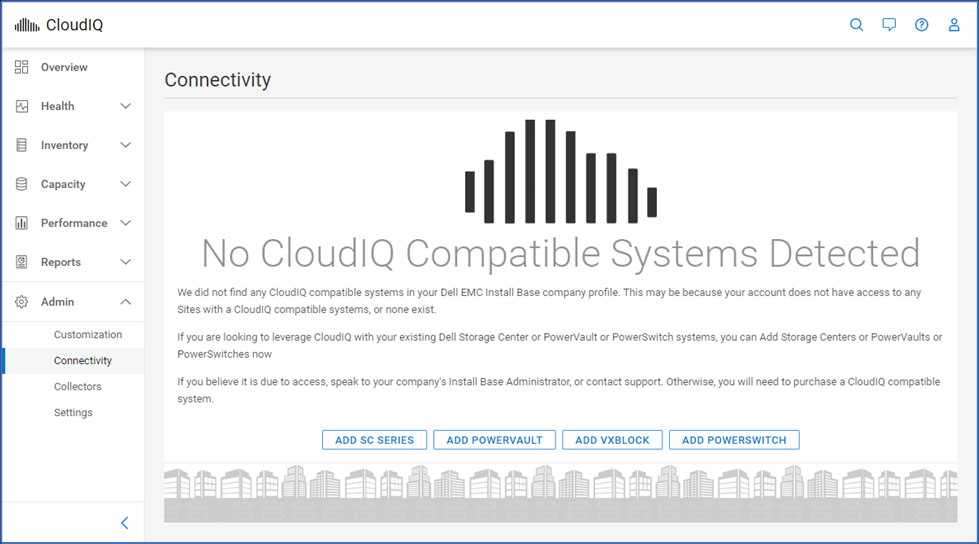
- If no systems were onboarded, the user is directed to the Connectivity page. If systems are onboarded, the user should go to the Admin > Connectivity page.
- Select ADD POWERVAULT from the Connectivity page.
- Step 1. SupportAssist - Instructions to enable CloudIQ in PowerVault Manager. Instructions are provided for both ME4 and ME5 series.
See the Information required to onboard PowerVault ME series in CloudIQ section of this article.
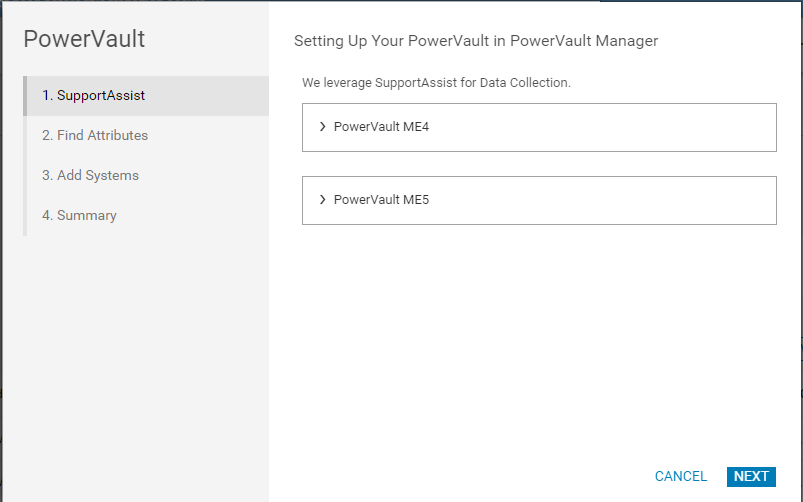
- Select Next once this step is completed in PowerVault Manager.
- Step 2 - Find Attributes.
Instructions on where to find the required attributes for onboarding are available for both ME4 and ME5 series.

- Select NEXT once this step is completed in PowerVault Manager.
- Step 3 - Add Systems. Enter attribute information from your PowerVault ME series array and select ADD.

- After attributes are entered, the user is presented with a Success message when system is onboarded. The user can add more systems or select NEXT.

- Select FINISH on the Summary Screen.

- The first time a PowerVault ME system is added to CloudIQ, it can take up to 4 hours for CloudIQ to be fully onboarded. Once the process is complete, the system appears in CloudIQ.
- Users only see PowerVault ME systems which they have onboarded using CloudIQ.
- Upon subsequent logins to CloudIQ, the default page that users see is the CloudIQ overview page.

Note: If a virtual machine is associated with a PowerVault array, there is no virtual machines tab available in CloudIQ. This is a limitation. We recommend filling out "Give Us Feedback" from the CloudIQ UI for future availability.
Additional information
No PowerVault system found with Service Tag <tag>
If you receive this message when onboarding the PowerVault ME array to CloudIQ, take the following steps:
- Ensure the attribute details that are entered for the ME array are correct see Information that is required to onboard PowerVault ME series in CloudIQ.
- Using PowerVault Manager, ensure both SupportAssist and CloudIQ are enabled.
- Test SupportAssist connection from PowerVault Manager to ensure that telemetry data can be sent to Dell from your PowerVault ME array.
- If this does not resolve the issue contact Dell PowerVault technical support.
CloudIQ - A Detailed Review
For more information about the CloudIQ service, a technical paper is available. See CloudIQ: A Detailed Review
Dell CloudIQ is available as an app on smartphones.
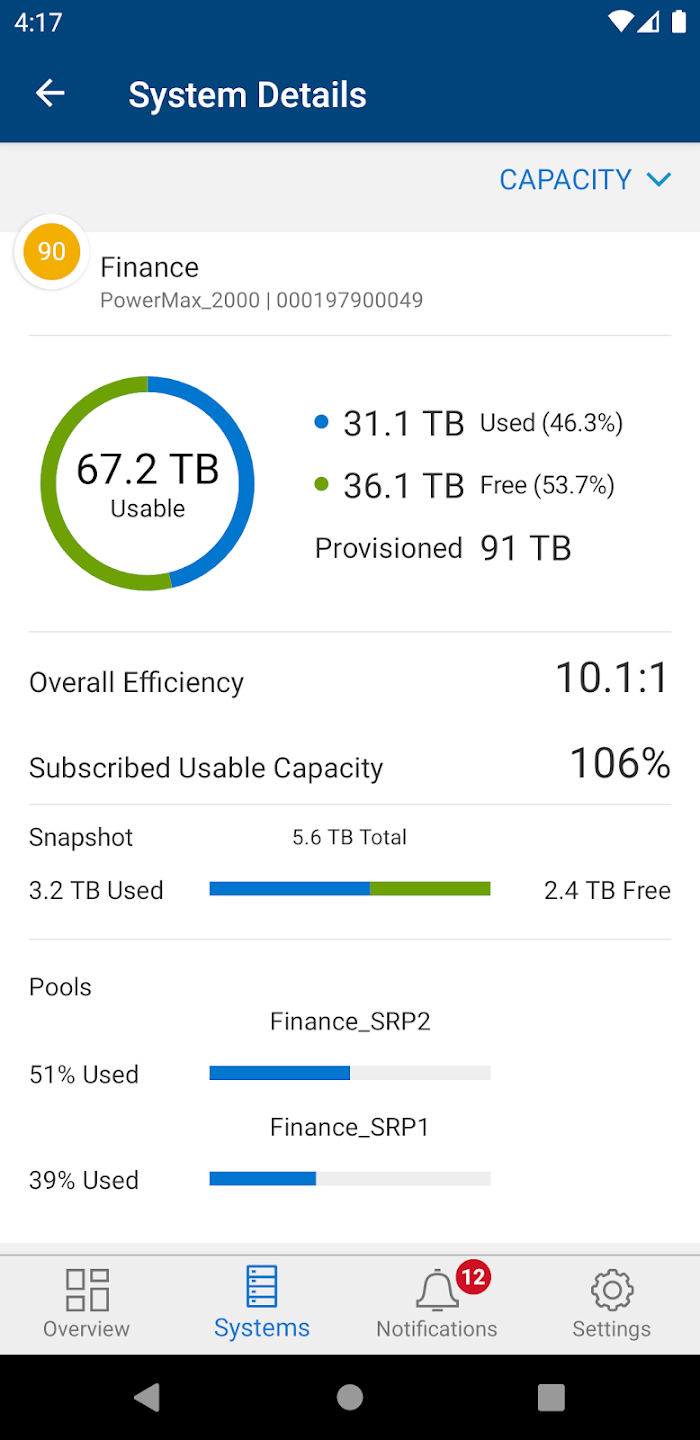 |
CloudIQ also has a mobile application available for both iOS and Android phones. The mobile app has an Overview screen that shows similar information to the Overview Page in the browser version of the UI. It also includes support for Health, Capacity, and Performance details for the supported Dell storage platforms. The user can also configure push notifications to be updated in the app for any health change notifications.
After you onboard your systems in CloudIQ desktop, a free download is available as Dell CloudIQ to install on Android systems using Google Play. Apple iPhone users can download Dell CloudIQ free from the Apple App Store. |
CloudIQ connector virtual appliance
Optional: CloudIQ uses a collector to gather information about VMware and Connectrix assets. The collector vApp is downloaded from the CloudIQ user interface and deployed within the vCenter environment to implement a collector in an environment. If you download and deploy this application, you may have to contact Dell technical support to activate it. See CloudIQ: Error: Unable to continue - You have no site ID available with which this gateway could be registered. Select a centralized gateway instead.
Article Properties
Affected Product
ME Series, CloudIQ, Dell EMC PowerVault ME4012, Dell EMC PowerVault ME4024, Dell EMC PowerVault ME4084, PowerVault ME5012, PowerVault ME5024, PowerVault ME5084
Last Published Date
15 Aug 2023
Version
10
Article Type
How To