Article Number: 000019481
Guide to manually replace disks using vCenter on Dell VxRail clusters
Summary: Step-by-step guide using vCenter to identify failed disk, remove disk or disk group, physically replace the faulted disk, mark the new disk as local, and add a new disk or disk group.
Article Content
Instructions
Considerations
Whenever possible, disks should be replaced following the Solve procedure. Authorized parties can access these procedures from the SolVe Online Portal.Steps to manually replace drives using the vCenter web client are generally visible. Steps to manually update the VXRM's database are visible to Dell Technologies employees and partners only.
For customers, field support, so on needing assistance with replacement disks shipped as a Customer Replaceable Unit (CRU), when the VxRail Manager's Hardware Replacement option has failed or is not available, open an SR with VxRail Remote Support and reference this article. A recommended SR would be Severity 2 or 3 set as 'Hardware' type. An appropriate SR Summary might be: 'VxRail drive replacement, assistance from VxRail Support is needed'.
There are three possible scenarios for drive failures and different approaches when removing and readding it to vSAN:
There are three possible scenarios for drive failures and different approaches when removing and readding it to vSAN:
- Capacity drives have failed (Remove disk more details on Step 2)
- Cache drives have failed (Remove disk group more details on Step 2, this removes all the drives from vSAN and they must be added to the new re-created disk group later, more details on Step 5)
- Cache or capacity drive have failed and deduplication and compression option is enabled (Remove disk group, this removes all the drives from vSAN and they must be added to the new re-created disk group later, more details on Step 5)
Step 1. Identify Failed Disk:
How to identify the physical slot of a failed disk when it is unknown (such as when vCenter has marked a disk as failed but iDRAC/VxRail Manager has not).
You may identify the failed disk using the vCenter Client.
- Click hosts and clusters view.
- Click the cluster level in the left pane.
- Click Configure (Manage in older versions) > vSAN > Disk Management.
- In the Disk Groups panel, find the disk group with the faulted disk and click the disk group to show the individual disks in the Disk Group Disks section below.
- There are two different options for identifying and or confirming the faulted disk:
- Identification through LED blink:

- Click the faulted disk in the Disk Group Disks section.
- Then click the three points (…) and select Turn-on LED.
- Identification through naa number:
- Identification through LED blink:
NOTE: Faulted disks usually display the vSAN UUID instead of the naa.
- You may use SSH to the host to try to obtain the naa. # of the disk by matching with the vSAN UUID:
# vdq -qH
Displays both the naa # and the vSAN UUID when it can:

# esxcli vsan storage list
Displays the naa #, the vSAN UUID and the UUID of the disk group when it can:

If neither can display the naa # for the associated vSAN UUID, you may use the method below to determine the naa of the disk using process of elimination.
- Look at the naa numbers of the other disks in the disk group recording the last 4-6 numbers of the number. If there are multiple disk groups on the host, do this for all the disk groups.
- In the VxRail Manager's physical view of the host, co-relate the naa numbers from vCenter to the GUID numbers in VxRail Manager.
- Search until you find the disk with a naa. # that is not on the list. This is the faulted disk.
Step 2. Remove Disk or Disk Group:
Prechecks:
It is 'Best Practice' to ensure that all virtual machines (VMs), including the service VMs have up-to-date backups (off the cluster) before doing this kind of maintenance. The cluster should be in good health, other than alerts related to the failed drives being replaced before beginning. This procedure must NOT be done if the vSAN does not have sufficient space remaining for full functionality without one or more disk groups that need correction.
- In the vCenter web client, 'Hosts and Clusters' view, place the host into Maintenance Mode using Ensure Accessibility. Right-click the host and click Enter Maintenance Mode.

- Select the Cluster and go to Configure (or 'Manage' in older versions) > Settings > Disk Management. (Here you remove the old disk.)
-
How to remove a disk from a disk group:
-
NOTE: If the customer is using deduplication and compression, individual capacity drives cannot be removed/replaced individually, the disk group must be removed and re-created. More capacity drives may be added to deduplicated and compressed disk groups without re-creating the disk group.
NOTE: If the failed drive is a cache tier drive, the disk group must be removed and re-created.
- In the Disk Groups panel, scroll to the correct host and select the disk group that has the faulted disk.
- Above the host list, there is a View Disks button.
- Open the list of the drives under the Disk group with the affected drive and select it.
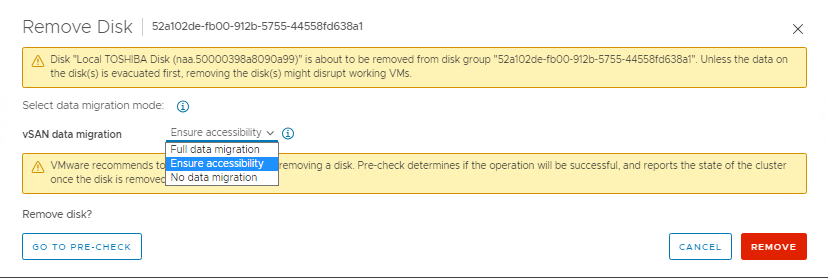
- Click the Remove disk button above the drive list. A window with options for 'full data migration', 'ensure accessibility', and 'no data migration' (wording depends on version) displays. The host should already be in Maintenance Mode with 'Ensure Accessibility' from Step 1 above, so all VM object data on the entire host should have a copy or exist elsewhere in the cluster. Select 'No Data Migration' for this part. Then click Remove.
- Wait for the 'Remove disks from use by Virtual San' task to complete. Go to Monitor > Tasks to watch the progress.


-
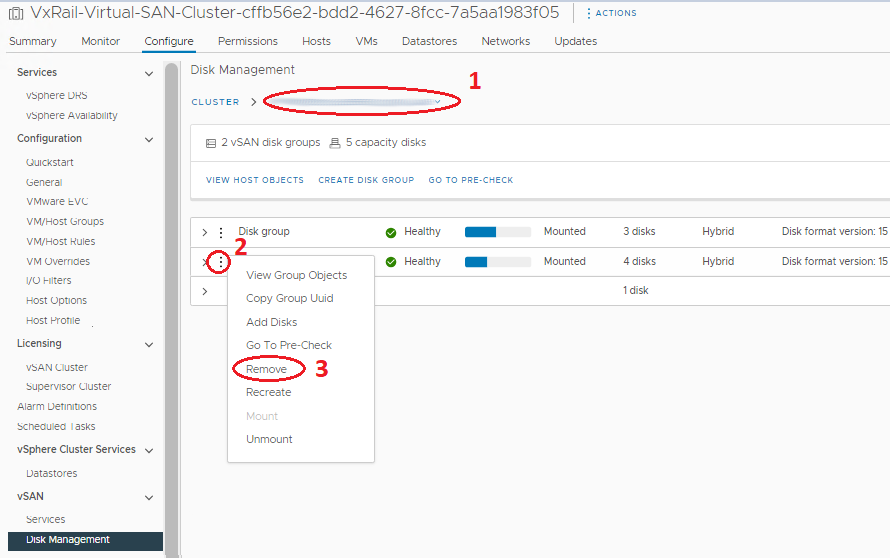
How to remove an entire disk group:
If the failed drive is a cache tier drive, the disk group must be removed and re-created.- In the Disk Groups panel, scroll to the correct host and select the disk group that has the faulted disk in it.
- Select the correct Disk Group and click the three points preceding it.
- On the Menu click, Remove. A window with options for 'full data migration', 'ensure accessibility', and 'no data migration' (wording depends on version) displays. The host should already be in Maintenance Mode with 'Ensure Accessibility' from Step 1 above, so all VM object data on the entire host should have a copy or exist elsewhere in the cluster. Select 'No Data Migration' for this part. Then click Remove.
- Wait for the 'Remove disks from use by Virtual San' task to complete. Go to Monitor > Tasks to watch the progress.

Step 3. Physically Replace the Faulted Disks:
The Solve Procedure has information regarding safety precautions and how to do this step. You must detach the carrier from the faulted disk and place the replacement disk in it as replacement drives usually do not ship with carriers. The host should still be in MM for this step to avoid inadvertently removing the wrong drive while I/O traffic might be possible. To further reduce risk, power the host down before physically replacing the drive, though this is not considered necessary.
Step 4. Mark the New Disks as Local:
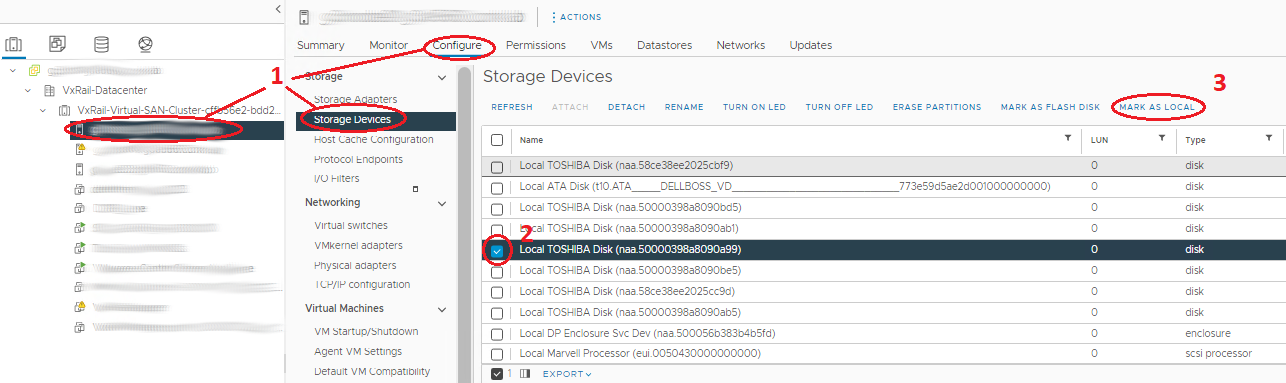
- Select the host in the navigator and Go to Manage > Storage > Storage Devices.
- Select the correct disk in the 'Storage Devices' middle panel. It should be the device with Type disk and not assigned Datastore.
- Select the correct option from above to mark the device as local. If the available option is to mark as 'Remote', the disk is already local.
Step 5. Add new Disks or Disk Group:
Ensure that the disk is marked as local before adding a disk or re-creating a disk group.
- Select the Cluster and Go to Configure (or 'Manage' in older versions) > Settings > Disk Management. (Here you add the new disk.)
-
How to add a disk to a disk group:
-
Note: Extra capacity drives may be added to deduplicated and compressed disk groups without re-creating the disk group.
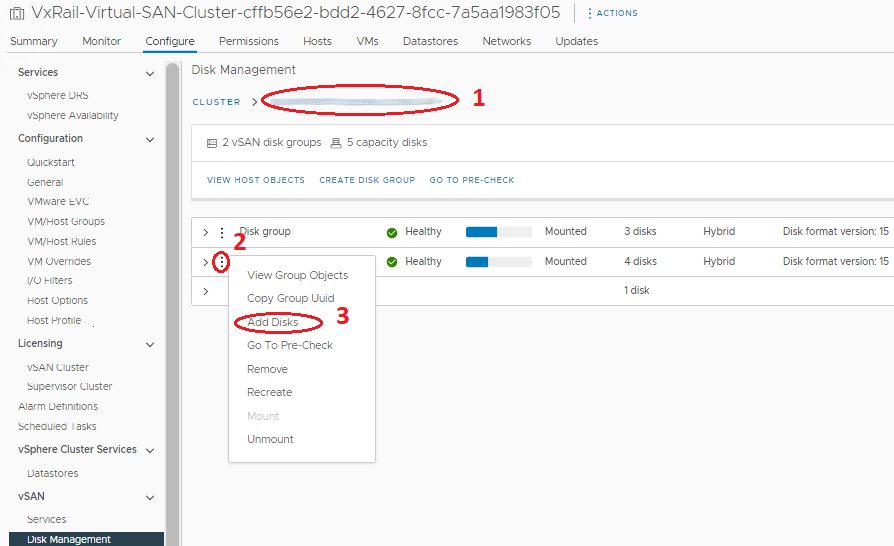
- In the Disk Groups panel, scroll to the correct host and select the disk group that the new disk is added to.
- Select the correct Disk Group and click the three points preceding it.
- In the menu that appears select Add Disks. On the display window mark the drives (if drives do not show on this window, check that the drive is marked as local) and click Add.
- Wait for the 'Add disks for use by Virtual San' task to complete. Go to Monitor > Tasks to watch the progress.
- Refresh at the top of the page and ensure that the disk groups look correct (Disks in Use have accurate number, State shows Mounted).
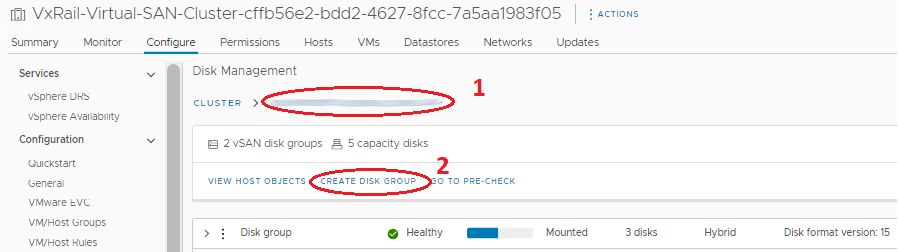
- How to add or re-create an entire disk group:
- In the Disk Groups panel, scroll to the correct host the disk group is created on.
- Above the Disk Groups panel, click the button Create Disk Group.
- In the window that appears select the cache disk in the Cache Tier section and select one or more capacity drives in the Capacity Tier section and click 'OK'.
- Wait for the task to 'Add disks for use by Virtual San' to complete. Go to Monitor > Tasks to watch the progress.
- Refresh at the top of the page and ensure that the disk groups look correct (Disks in Use have accurate number, State shows Mounted).
NOTE: At this point, vCenter and the host should show the disk 'In Use for VSAN' and healthy. The VxRail Manager database would still hold stale information about the old disk that has been replaced, showing a missing disk on the Physical Health page. The VxRail Manager can now be manually updated as well, to remove the old drives, and add new ones to its database so the new ones display in Physical Health. VxRail Support can do this procedure through a Service Request.
Additional Information
Related Resources
Here are some recommended resources related to this topic that might be of interest to you.
- Dell VxRail: How to manually remove and re-create a vSAN disk group using esxcli commands
- Dell VxRail: Power Supply Unit or Disk Cannot be Contacted on Physical View of VxRail Manager Plug-in
- Dell VxRail: After replacing a disk, the physical view in VxRail Plug-in is showing the disk slot as unmanaged and the drive configuration empty
- Dell VxRail: vSAN object inaccessible, Disk failure, excessive I/O latency, disk overall health red
- Dell VxRail: VxRail Manager root Password is Lost
Refer to this video:
You can also view this video on YouTube .
Article Properties
Affected Product
VxRail, VxRail Appliance Series
Last Published Date
25 Apr 2024
Version
20
Article Type
How To