Article Number: 000205564
Adding VLANs to Unified Computing System Manager when updating service profile templates and vNIC templates are in use
Summary: Addition of VLANs to Unified Computing System (UCS) Manager when using updating service profile templates and vNIC templates.
Article Content
Instructions
Facts:
Cisco UCS Manager
Solution:
- Create the VLAN as specified in the existing guide. (LAN > LAN Cloud > VLANs > right click and select Create VLANs).

Figure 1: Create VLAN
- After VLAN creation, select the service profile to add the VLAN to.
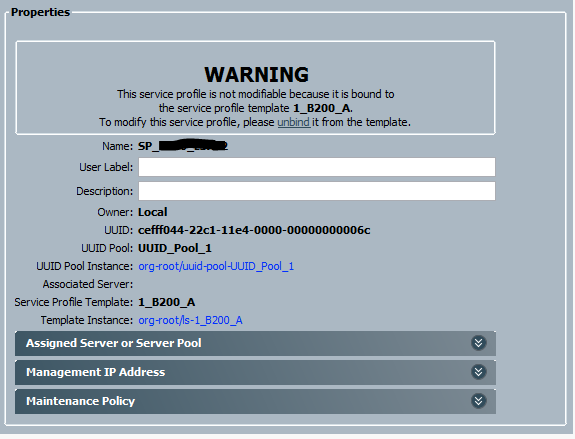
Figure 2: Service Profile Warning Message
- Above, the service profile named SP_xxx is linked to service profile template 1_B200_A. Click the highlighted name of the service profile template to open it.

Figure 3: Service Profile Template Properties
- The service profile template is of type Updating, meaning all service profiles bound to it automatically update with any changes made to the template.
- From the tabs on top of the window, select Network.
- Select a vNIC and click the Modify button.
- In the Modify vNIC window, notice that the vNIC is using a vNIC template. Take note of the vNIC template in use and repeat this process for any other vNICs within the service profile template which you want to add the VLAN to.
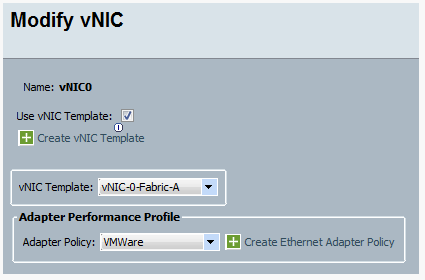
Figure 4: Modify vNIC Template
- Return to the main UCS Manager window and select the LAN tab. Expand the Policies menu > the root organization, and then expand vNIC Templates.

Figure 5: Expand vNIC Template Tree
- Select the vNIC template you want to modify and on the Actions menu on the right, click Modify VLANs.
- Within the Modify VLANs window, place a check in the box next to the VLAN you want to add.
- Click OK to save and close the window.
- As shown below, the VLAN changes are propagated to the service profiles which are bound to the service profile template.

Figure 6: Changes Propagated to Service Profile Template
- Complete the rest of the Adding VLANs to the Vblock Guide to add the VLAN to the Nexus 5K and Nexus 1K.
Additional Information
Article Properties
Affected Product
Switches
Last Published Date
24 Jan 2023
Version
3
Article Type
How To